

|
|
|
|
This quick and easy upgrade gives two things: a small increase in performance due to the engine being able to suck in a little more air, and some great induction noises with the throttle open! The JR air filter I installed gives only a little more noise at motorway cruising speeds, so although it sounds great when accelerating, it does not get annoying when cruising. I should imagine other bolt on filters give similar results. One American website I came across while researching this subject detailed the installation of a K&N 57i filter on a later MR2 Mk1. The owner reported that the K&N gave an annoying whistle at cruising speeds, although this has been disputed by a number of members of the IMOC-UK. The JR air filter appears well made and is available in the UK from Fensport.
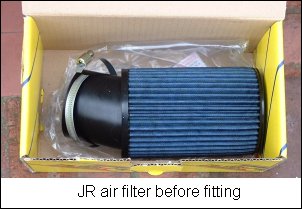 The JR air filter is a cylindrical filter approximately 20cm long with a rubber duct which is fixed over the throttle body using the supplied
clip. Filtration is accomplished by the blue fabric mesh which is covered in filtration oil. Unlike the standard air filter element, the JR
filter is not a throw away part: at regular intervals it should be removed and cleaned using an air filter cleaning solution, followed by
application of filtration oil. Both these items can be obtained from Fensport along with the filter itself.
The JR air filter is a cylindrical filter approximately 20cm long with a rubber duct which is fixed over the throttle body using the supplied
clip. Filtration is accomplished by the blue fabric mesh which is covered in filtration oil. Unlike the standard air filter element, the JR
filter is not a throw away part: at regular intervals it should be removed and cleaned using an air filter cleaning solution, followed by
application of filtration oil. Both these items can be obtained from Fensport along with the filter itself.
The JR filter replaces the existing air filter and associated boxes and ducting. This guide details the process for early Mk1 MR2s which have all the boxes and ducting in the engine bay, but the process is similar (and similarly easy) for later cars that have the air filter and ducting in the rear boot.
Only basic tools are required for this job: a socket set and some screwdrivers. The socket set should include an extension, and
optionally a universal joint, as some of the air filter ducting bolts are a little awkward to get at.
 The original air intake system consists of an air intake duct that picks up air forward of the battery and routes it around to the air filter box
behind the battery. Air is also fed via a foam hose branching off the intake duct to a plastic box fitted to the bottom of the air filter box. This
appears to be a resonator box, but confirmation would be appreciated. The air filter box is attached to a front panel which has attachments for the
intake duct and for connection of a rubber pipe feeding filtered air to the throttle body at the end of the T-VIS system.
The original air intake system consists of an air intake duct that picks up air forward of the battery and routes it around to the air filter box
behind the battery. Air is also fed via a foam hose branching off the intake duct to a plastic box fitted to the bottom of the air filter box. This
appears to be a resonator box, but confirmation would be appreciated. The air filter box is attached to a front panel which has attachments for the
intake duct and for connection of a rubber pipe feeding filtered air to the throttle body at the end of the T-VIS system.
UK cars have an idle-up valve connected to the air filter box and T-VIS unit with a couple of rubber tubes. The function of this valve is
to allow a little extra air into the throttle body (so boosting revs) when a high electrical load is placed on the alternator, which causes
the revs to drop. I have blocked these tubes off without any adverse effect. They should be blocked (particularly the one connected to the T-VIS
unit) to stop unfiltered air getting where it should not.
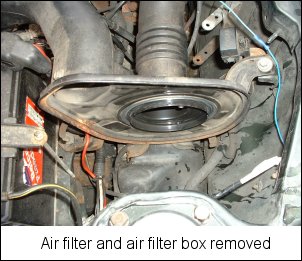 The first step in removing the original parts is to remove the air filter box and air filter itself.
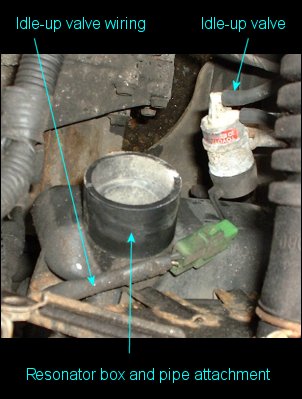
This is done by releasing the four clips around the periphery
of the air filter box and lifting the box (complete with air filter inside) clear of the engine bay. This leaves just the front plate of the air
filter box in place (visible in the centre of the photo, left). It also leaves the plastic resonator box
in place below (visible lower centre of the photo, left).
The first step in removing the original parts is to remove the air filter box and air filter itself.
This is done by releasing the four clips around the periphery
of the air filter box and lifting the box (complete with air filter inside) clear of the engine bay. This leaves just the front plate of the air
filter box in place (visible in the centre of the photo, left). It also leaves the plastic resonator box
in place below (visible lower centre of the photo, left).
The next task is to remove the air intake duct. It is held on using two bolts: one anchoring it to a bracket forward of the battery that also holds
the battery in place, the other holding it to the front panel of the air filter box. Simply undo both bolts and lift the duct clear. Also remove the
foam pipe leading from the duct to the resonator box (it just pulls free).
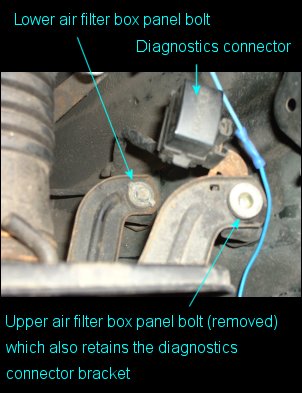 Removing the front panel of the air filter box is a little more tricky. It is held in place using three bolts: one anchoring it to the battery
tray, and two anchoring it to small brackets attached to the rear bulkhead. You will need an extension bar to reach the battery tray bolt,
and a universal joint is useful
too. Be careful here as you will be working very close to the positive battery terminal; it is advisable to disconnect the battery negative terminal
to prevent any accidents. The upper of the two
bulkhead bolts is simple to remove, the lower is easier to remove if you first pull the diagnostics connector off its bracket which is
held in place by the upper bolt.
Removing the front panel of the air filter box is a little more tricky. It is held in place using three bolts: one anchoring it to the battery
tray, and two anchoring it to small brackets attached to the rear bulkhead. You will need an extension bar to reach the battery tray bolt,
and a universal joint is useful
too. Be careful here as you will be working very close to the positive battery terminal; it is advisable to disconnect the battery negative terminal
to prevent any accidents. The upper of the two
bulkhead bolts is simple to remove, the lower is easier to remove if you first pull the diagnostics connector off its bracket which is
held in place by the upper bolt.
 Now slacken off the screw on the jubilee clip holding the pipe to the T-VIS unit. You can now lift the front panel clear of the engine bay with
resonator box and T-VIS pipe attached. Be careful not to catch the idle-up valve wiring as you do so. My idle-up valve was hanging free in the
engine bay as can be seen in the photo, left, but it should have been bolted to a bracket somewhere. Note the two rubber tubes connected to the top
of the idle-up valve in the photo, left. These need to be tidied up later (see below).
Now slacken off the screw on the jubilee clip holding the pipe to the T-VIS unit. You can now lift the front panel clear of the engine bay with
resonator box and T-VIS pipe attached. Be careful not to catch the idle-up valve wiring as you do so. My idle-up valve was hanging free in the
engine bay as can be seen in the photo, left, but it should have been bolted to a bracket somewhere. Note the two rubber tubes connected to the top
of the idle-up valve in the photo, left. These need to be tidied up later (see below).
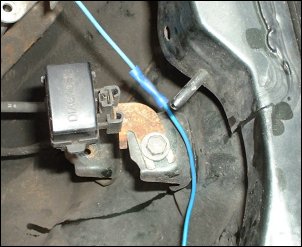 Speaking of tidying up, bolt the diagnostic connector
bracket back to the upper bulkhead bracket using one of the bolts that held the intake ducting in place (the bolts that held the air filter box
panel in place are not suitable as they have a complicated washer arrangement).
Speaking of tidying up, bolt the diagnostic connector
bracket back to the upper bulkhead bracket using one of the bolts that held the intake ducting in place (the bolts that held the air filter box
panel in place are not suitable as they have a complicated washer arrangement).
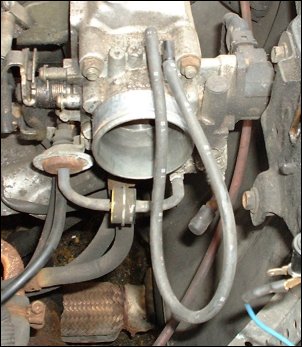 While the throttle body is exposed, run your finger or a clean rag around the inside of it to remove some of the oily gunge that builds up in there,
presumably due to the PCV system. Next, disconnect both tubes from the idle-up valve. Connect the free end of the one coming from the T-VIS unit over
the rubber cap blocking off one of the other T-VIS connector pipes. This is UK-specific - if you have a non-UK car you may have to block this tube
off in a different manner - but it is important do so otherwise it will suck unfiltered air into the throttle body and onwards into the
engine.
While the throttle body is exposed, run your finger or a clean rag around the inside of it to remove some of the oily gunge that builds up in there,
presumably due to the PCV system. Next, disconnect both tubes from the idle-up valve. Connect the free end of the one coming from the T-VIS unit over
the rubber cap blocking off one of the other T-VIS connector pipes. This is UK-specific - if you have a non-UK car you may have to block this tube
off in a different manner - but it is important do so otherwise it will suck unfiltered air into the throttle body and onwards into the
engine.
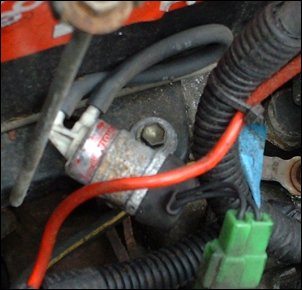 The idle-up valve will now have a tube dangling free. Connect the free end to the connection left free by disconnection of the T-VIS tube detailed
above. This now seals the idle-up valve and protects it from dirty air should you wish to use it in the future. Now bolt the idle-up valve to the
bracket on the battery tray that was used to anchor the air filter box panel.
The idle-up valve will now have a tube dangling free. Connect the free end to the connection left free by disconnection of the T-VIS tube detailed
above. This now seals the idle-up valve and protects it from dirty air should you wish to use it in the future. Now bolt the idle-up valve to the
bracket on the battery tray that was used to anchor the air filter box panel.
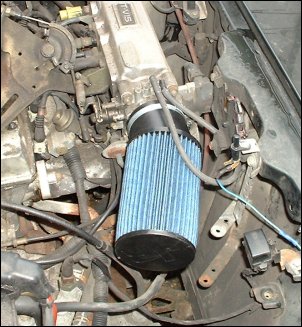 Fit the rubber duct of the JR filter over the air intake on the T-VIS. It is quite stiff but it will fit.
The rubber duct is at an angle to the filter, which is useful as the engine bay hood would come into contact with the filter if it was left straight.
Turn the filter until it is pointing downwards a little, and check it is clear of the engine bay hood by lowering the latter slowly.
Now tighten the screw on the jubilee clip, making sure the metal band of the jubilee clip is clamping the duct to the intake in the area of the
intake behind the lip on the end of the intake, to ensure it is secure.
Fit the rubber duct of the JR filter over the air intake on the T-VIS. It is quite stiff but it will fit.
The rubber duct is at an angle to the filter, which is useful as the engine bay hood would come into contact with the filter if it was left straight.
Turn the filter until it is pointing downwards a little, and check it is clear of the engine bay hood by lowering the latter slowly.
Now tighten the screw on the jubilee clip, making sure the metal band of the jubilee clip is clamping the duct to the intake in the area of the
intake behind the lip on the end of the intake, to ensure it is secure.
Now check the engine bay for any left-over tools and start the engine. If everything appears ok, drop the engine bay hood and take the car out for a drive, enjoying the various intake sounds under acceleration etc. When you get back, have another look in the engine bay to make sure the filter and the idle-up valve tubing is as you left it. Check again a few days later too.
The filter should be cleaned and oiled every so often. The instructions do not specify the interval so I am going to do this at every service.
A pack containing both the cleaning solution and the filter oil is available from Fensport when you buy
the filter or at a later date.
I found that the filtration oil did not last very long at all, presumably it is rapidly sucked into the engine. So I increased the frequency at which I applied it. Even so, I suspect the filtration of this kind of filter is not as good as the original paper filter, and engine life may be shortened accordingly. You may wish to consider this before replacing the original.